Scenario: Import to SharePoint from Excel
Do you have a large SharePoint list with dozens, hundreds, or even thousands of items? And, are some of the columns in your list choice fields based on lookup values from other SharePoint lists? If you have data from an Excel file that you need to import to SharePoint from Excel, you’ll quickly find that a straightforward copy and paste operation won’t cut it. However, with a bit of prep work you can absolutely do a bulk import of your data without having to write code, or buy a special add-in.
Setting up for the Import
You will need to do a bit of prep work before you can do the actual import. But this setup work is trivial compared to trying to manually select the individual items throughout the list. This is especially true if you have hundreds or even thousands of items that need to be updated. And of course, there’s the likelihood of some amount of input error along the way.
Quick Overview of the Steps Needed
Below, you’ll find the step by step process but here’s an overview in case you just need to skip to the section of interest to you.
First, you’ll need to create a helper text (single line) field to paste into. We’ll be using clipboard integration on this one.
Next, you’ll create a SharePoint workflow to manage the assignment of the values to the choice field.
You’ll need to massage the input data into a specific format to be recognized by SharePoint. Depending on your comfort level in Excel, this step may take you some effort.
Finally, you’ll copy/paste into your list within the datasheet view.
Step by Step
Create the Helper Field
The helper field, in this case, is a plain text field (Single Line of Text). Create that field and for this example we’ll say you named the field field1.
Create the SharePoint Workflow
You will next create a small workflow (or add to an existing one).
Workflow Settings
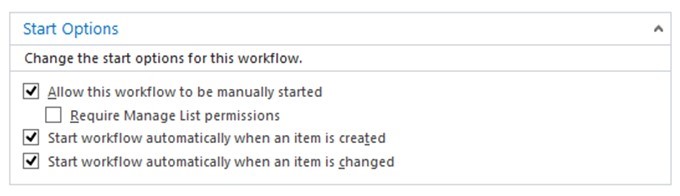
Be sure you set this workflow to trigger on change or on creation to be sure it fires when you paste the data in. You’ll find these in the Workflow Settings area.
Workflow Actions
Your workflow will need to have two actions added to it.
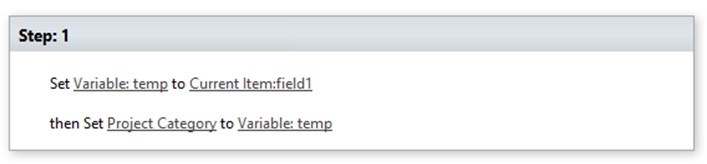
- Create a Workflow Variable of type String and assign the contents of the helper column to it using the Set workflow variable to value action. Let’s say you call the variable ‘temp’.
- Next, assign the value of the Workflow Variable to your choice field using the Set field in current item action.
Don’t forget to save your workflow and field changes too.
Your finished workflow should look similar to the following.
Massage the Input Data
In your Excel table, you’ll have the data you want to import into your SharePoint list. The data may have selections in individual columns, in a single column, or whatever. The key is to create a column in Excel that represents all of the fields you want selected and formatted in a specific manner so that SharePoint will recognize the multiple selections.
The format needed for this import follows.
;#<ID>;#<label>;#<ID>;#<label>
It is critical that you separate the elements with the semicolon and pound sign (“;#”). The values will not be recognized without the above formatting.
The ID Value
The ID value is the ID value from your lookup list. This is the item ID as assigned by SharePoint. You can export that lookup list from SharePoint into your worksheet (be sure to include the ID column) so that you can do lookups as needed in your data formatting.
The Label Value
If the text values you see for your choices are short, you can use them here. The actual values you provide in the label are not important because the actual values will be retrieved from your lookup list on SharePoint based on the IDs.
Remember, the single line of text field holds 256 characters so don’t get so verbose that you blow that out of the water.Here’s an example of the prepared data from Excel that is ready for import.
;#1;#My Value;#4;#Another Item
Paste into SharePoint
Once you have the data prepared according to the formatting above, you’re ready to paste from Excel to SharePoint. You will paste the data into the helper field (field1 in this example). Once you do that, the workflow you created will update each record and select the options from your choice column. This step may take a few minutes behind the scenes after you paste into the list.
Here are some things to keep in mind.
- Ensure the record order in your Excel sheet exactly matches the order of the list in SharePoint (you’ll be doing this in Edit List or Datasheet view). If you don’t, you’re data won’t be matched up with the correct record.
- Once you are done, don’t forget to delete the workflow (or the step added to an existing workflow). If you don’t, the workflow will override any changes you may do thru an item edit on the form.
- If you don’t need the helper column any longer, you can remove it once the workflows run on each of the items. Be sure all of the workflows have run on the items before you remove the helper column.
Final Tally
Looking at the task at hand and considering the options, you can summarize the above as follows.
Time spent creating helper field: minutes
Time spent creating workflow: minutes
Time spent massaging data: minutes
Time saved by doing the bulk import: priceless
There you go.


This technique is fine for SharePoint 2010 on prem, but it does not work for SharePoint in Office 365 cloud… have you found a technique that works there as well?
I’ve been able to use this with a SharePoint 2013 hosted solution in Office 365. What step fails in your environment?
This is awesome, thanks!
Any tips for something related: importing in bulk from Excel when a column needs to be of SharePoint-type Person/Group?
Thank you! After attempting to work with SSIS and then Excel to SharePoint, I finally found this link and it works!! Thank you!!
Thanks for the tip! I was trying to get it to work for the whole day in SharePoint 2013. The i realised that the functionality is already there! All you have to do is to format data in your Excel like this: ;; so no need for # anymore.. Then you can just copy – paste your data.
Oops, sory, no code here, so the format is: ;My Value;Another Item etc…
Even easier way of doing this will be -> Import the sheet using Excel Import inside SharePoint to a temporary list. Now, create a simple workflow, write a loop for exact number of items in the temp list, for each item, read the temp list item values, and update in destination. Before doing this, make sure, all possible choice columns values are already present